Thursday, May 24, 2012

Cube Collage

A collage is a work of formal art, primarily in the visual arts, made from an assemblage of different forms, thus creating a new whole.  [From Wikipedia, the free encyclopedia]

Abstract

Let's make a simple collage on sides of a cube (see Figure 0).

For the simplicity, the same forms will be used for all visible sides of the cube in this tutorial.

Figure 0 - Tutorial Target

Task and Decision

We have to create an isometric projection of a cube from its three plane unfolded sides filled with assembled forms (see Figure 0).
In isometric projection the three coordinate axes appear equally foreshortened and the angles between any two of them are 120 degrees. [From Wikipedia, the free encyclopedia]
We'll start with three unfolded cube sides. Then we'll import some images, assemble them in some way, and place the result on each side of the cube. Finally, we'll scale each side by cos 30, skew them by -30/30, and additionally rotate the top side by -30 to transform unfolded sides into the isometric projection.

Note

We'll use neither the Create 3D Box Tool nor the Axonometric Grid feature of Inkscape. We are going to add some design to plane sides of the cube and transform them along with their design.

Required Tools

  • Selector
  • Rectangle Tool
  • Text Tool

Instructions

  1. Run Inkscape.
  2. Set the document size (File -> Document Properties...) to 500 x 500 px. Go to the Grids tab. Add a new rectangular grid and set spacing (both X and Y) to 50 px.
  3. Using the Rectangle Tool, draw a rectangle 250 x 250 px (5 x 5 grid cells) at the bottom left quarter of the page. Set the stroke width (Object -> Fill and Stroke...) to 1 px.
  4. Double the rectangle (Ctrl + D) twice. Using the Selector, move copies to the right and top keeping one side common with the original rectangle.
  5. Fill the rectangles with different colors, e.g. Lime, Aqua, and Yellow (see Figure 1). The simplest way to do so: select rectangles one by one with the Selector and choose the desired color from the Palette by clicking.
  6. Import (File -> Import...) the Open Book SVG image (see the Open Book tutorial). Scale it (File -> Transform...) proportionally by 13%. Otherwise you can use any other image or even just draw a circle, a rectangle, a star, or a spiral using Inkscape tools.
  7. Import the Interlocked Monogram SVG image (see the Interlocked Monogram tutorial). Scale it proportionally by 50%. Otherwise use any other image.
  8. Double the monogram. Flip the copy horizontal (Object -> Flip Horizontal). Move the copy close to the left page of the book and the original close to the right page.
  9. Holding SHIFT, select both monogram, then select the book. Align the selections (Object -> Align and Distribute...) relative to Last selected: center on horizontal axis and distribute centres equidistantly horizontally.
  10. Using the Text Tool, add some text at the top of the book, e.g. "Made with Inkscape, 2012". Play with fonts and size a bit. Set color to Maroon. Holding SHIFT, select the text, then the book. Align center on vertical axis.
  11. Holding SHIFT, select both monogram, the text, and the book. Group all four objects (Object -> Group).
  12. Double the group twice. Move the copies and the original close to the rectangles (one group per a rectangle).
  13. For each rectangle: holding SHIFT, select the group, then the rectangle; align center on vertical and horizontal axis; group the selections (see Figure 1).
  14. Scale the width of the bottom rectangles and the height of the top rectangle by 86.6% (cos 30). Adjust the rectangles so that one corner of each rectangle match the center of the document page (see Figure 1).
  15. Select the bottom left rectangle. Click the selection to toggle handles to the rotation mode. Drag the cross from the center of the selection exactly to the common corner of all rectangles (zooming will help). Holding CTRL, drag the selection by the middle left handle up to skew it by -30 (see Figure 1).
  16. Apply the Step 15 to the bottom right rectangle. This time, however, use the middle right handle and skew by 30.
  17. Apply the Step 15 to the top rectangle, but drag the middle top handle rightward and skew by 30 (see Figure 1).
  18. Holding CTRL, drag the top right handle of the top rectangle down to rotate the rectangle by -30 (see Figure 1).
  19. Save your work.
  20. Enjoy!
Figure 1 - Important Steps

Summary

The idea of assembling different forms to create a new whole has been introduced in this tutorial. You can develop it according to your needs, preferences, and imagination.

Also the technique of creating an isometric projection of a cube has been explained and illustrated step-by-step.

The following operations have been used specifically:

  • Doubling
  • Filling
  • Importing
  • Scaling
  • Flipping
  • Aligning
  • Grouping
  • Zooming
  • Skewing
  • Rotating

Together, both skills you just learned are pretty good for various presentations, especially, of something 3-in-1.

Wednesday, May 9, 2012

Open Book

Abstract

This tutorial highlights the design of a simple but still pretty useful realistic image of an open book (see Figure 0).

Figure 0. Tutorial Target.

Required Tools

  • Selector
  • Node Tool
  • Rectangle Tool
  • Gradient Tool

Instructions

  1. Run Inkscape.
  2. Set desired document properties. Take special attention to its size - it reasonable should roughly depend on the imitated  book format. Say, US Letter = 8.5" x 11", so your calculations for image itself would look like this: 850px (the left page) + 850 px (the right page) = 1700 px (Width) x 1100 px (Height). The full page (i.t. the document) might be expanded to 2000 x 1500 px.
  3. Set the grid according to the book format, e.g. Spacing X = 85 px and Spacing Y = 110 px in case of US Letter format. Be sure snapping are enabled and turned on.
  4. With the Rectangle Tool, create the rectangle covering 10 x 10 grid cells (close to the left side of the Canvas) and another one 10 x 1 grid cells slightly above the first. Drag the round handler at the upper-right corner of the latter rectangle downwards as below as possible (to the middle of the right side). It rounds the rectangle corners (see Figure 1).
  5. Select the rounded rectangle and convert it into Path (Path -> Object to Path).
  6. Using the Node Tool, select (holding SHIFT) and delete two upper nodes (see Figure 1).
  7. Duplicate the result of the previous modification (CTRL+D).
  8. Using Selector, drag the copy down to the bottom of the large rectangle. Then drag the original to the top of the large rectangle. Carefully adjust both original and copy as shown below (see Figure 1).
  9. Select the large rectangle and the upper object (SHIFT+Selector). Execute Path -> Union (see Figure 1).
  10. Select the union and the lower object (SHIFT+Selector). Execute Path -> Division (see Figure 1).
  11. Select the small section below the large object and open the Fill and Stroke Dialog Window (Object -> Fill and Stroke...). Click the Fill tab, then the Pattern button.  Choose the Wavy pattern from the drop-down list. Set the Blur to 0.5 (see Figure 1).
  12. Using the Rectangle Tool, create a tall rectangle overlapping about one grid cell at the left side of the large upper object (see Figure 1).
  13. Select the large upper object and the overlapping rectangle (SHIFT+Selector) and execute Path -> Division (see Figure 1).
  14. Select the new most left object and fill it with the Stripes 1:1 pattern (refer Step 11 if necessary). Set the Blur to 1.5 (see Figure 1). Check if filling accurately matches the upper-left and bottom-left corners. If necessary, examine the Strips 1:1.5 or the Strips 1:2 patterns (with those patterns increase the Blur up to 2.0). Also you can Undo (CTRL+Z) last actions back to Step 12 and try to overlap a bit more or less wider area this time.
  15. Select the page (the large object only). Using the Gradient Tool, create a new gradient across the page horizontally. Select the left stop point and set it to #FFD6E5 (click the appropriate color from the Palette), then select the right stop point and set it to #FFCCAA (see Figure 1).
  16. Select all objects (CTRL+A), duplicate them (CTRL+D), and flip horizontally (Object -> Flip horizontal). Keeping selection, move the copy to the right while its left side match the right side of the original (see Figure 1).
  17. Select the right page (the large object only). Switch to the Gradient Tool and press SHIFT-R to reverse the gradient colors (see Figure 1).
  18. Save your work.
  19. Enjoy!
Figure 1. Open Book: Important Steps.

Summary

In this tutorial we have learned the creative design of an Open Book image. We have also demonstrated  the effective technique of symmetric object design: only a half of the image have been really designed - and finally duplicated and flipped.

The following things have been highlighted specifically:

  • Method of reasonable calculations of the document size and the grid spacing;
  • Elementary operations with Gradient and Path (including Union and Division);
  • Filling objects with Pattern.


You can utilize the designed image as a part of your various future projects or even as their start point.

Tuesday, May 8, 2012

Interlocked Monogram

A monogram is a motif made by overlapping or combining two or more letters or other graphemes to form one symbol. Monograms are often made by combining the initials of an individual or a company, used as recognizable symbols or logos. [From Wikipedia, the free encyclopedia]

Abstract

This tutorial provides an easy and fast way to intersect letters (generally, as well as any other objects) using base Inkscape tools (see Figure 0).

Figure 0. Tutorial Target.

Overview

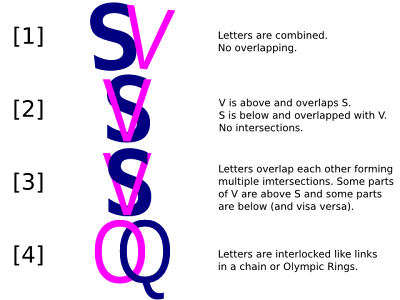
As mentioned above, letters in monograms may be either combined or overlapped in some ways (see Figure 1 and Table 1).

Figure 1. Combined, Overlapped, Intersected, and Interlocked Letters.

There are nothing interesting in combined letters (Case [1]). They are just a sequence of two or more letters placed side-by-side without overlapping. Dragging letters over the Canvas - and probably slight rotating - are all skills needed for this purpose.

Also Case [2] is very trivial: let's consider the letters lie each on its own plane so all planes are parallel, thereby no intersection is possible. Again, dragging/rotating is only required to take letters in the stack - the latter (in sense of creation) is above and overlaps the first.

Other two cases are more complicated because of intersections. Letters are no longer parallel - they overlap each other with intertwining (open-shaped letters, Case [3]) or even interlocking (close-shaped letters, Case [4]). Both such cases are the subject of the further discussion in this tutorial.


Table 1. Variants of Letter Relations in Monograms
[1] [2] [3] [4]
Combining + + + +
Overlapping - + + +
Intersecting - - + +
Interlocking - - - +

Note

In the rest of the tutorial I usually tend to use overlapping in meaning overlapping without intersection, such as in Case [2].

There are several pretty good tutorials and tips on chain and monogram design with Inkscape on the Web. None, however, teaches how to intersect letters provided by fonts installed on his or her computer. All those tutorials draw links and letters from scratch - and what if he or she have to intersect already existing letters. Closed shapes of letters may definitely cause some troubles and even open-shaped letters may too. Don't worry, no more problems due to this tutorial. Read it, follow it, and be happy.

Task and Decision


Figure 2: Open- and close-shaped letters in pairs.

The letters above (see Figure 2) should be intersected but they aren't. They are only overlapped. It seems completely impossible to insert letters each inside other keeping their integrity, doesn't it?

Well, just split one of letters into pieces using some extra simple shape and Division from the Path menu (see detailed step-by-step Instructions below). Repeat this process for each pair. Then create an additional layer and distribute the whole letters and pieces of another ones among all layers in the proper order. That's all.

Required Tools

  • Selector
  • Text Tool
  • Rectangle Tool

Instructions

  1. Run Inkscape.
  2. Set desired document properties.
  3. Choose letters to interlock and create a separate text object for each letter using the Text Tool. Set desired font, size, color, and other properties (see Figure 3).
  4. Create a rectangle using the Rectangle Tool. Drag the rectangle over one of letters using the Selector and/or arrow keys to overlap the piece to be split. Adjust overlapping with ALT + arrow keys (see Figure 3).
  5. Select both the rectangle and the overlapped letter (SHIFT + Selector).
  6. Execute Path -> Division on the selected items. It split the letter into two pieces. The rectangle disappears (see Figure 3).
  7. Repeat Steps 4 to 6 to split more pieces if needed (see Figure 3).
  8. Place both whole and split letters in the desired manner - yet despite intersecting though (see Figure 3).
  9. Create a new layer above the current one (Layer -> Add Layer...).
  10. Select the piece or pieces of the split letter having to be above the whole letter. Use ALT + Selector repeatedly, if necessary, to be able to select the required piece(s).
  11. Execute Layer -> Move Selection to Layer Above (see Figure 3).
  12. Save your work.
  13. Enjoy.
Figure 3. Interlocked Monogram: Important Steps.

Summary

In this tutorial we have learned the effective design of Interlocked Monogram. The way covered here is simple, easy, and fast. No advanced knowledge or skills are prerequisite. We have also tried to show the spatial relationship between the letters forming the monogram.

Specifically, we covered:

  • Usage of Division to split letters into pieces;
  • Distribution of the split pieces between layers;
  • Intersections of letters (intertwining and interlocking).

These new skills may be applied to a much wider range of objects that explicitly enhance your artistic opportunities.