A monogram is a motif made by overlapping or combining two or more letters or other graphemes to form one symbol. Monograms are often made by combining the initials of an individual or a company, used as recognizable symbols or logos. [From Wikipedia, the free encyclopedia]
Abstract
This tutorial provides an easy and fast way to intersect letters (generally, as well as any other objects) using base Inkscape tools (see Figure 0).
 |
| Figure 0. Tutorial Target. |
Overview
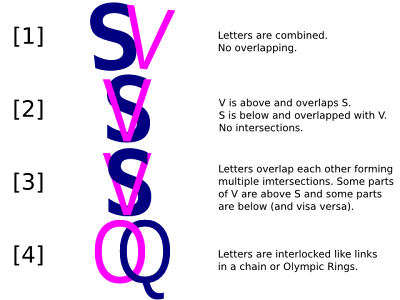
As mentioned above, letters in monograms may be either combined or overlapped in some ways (see Figure 1 and Table 1).
 |
| Figure 1. Combined, Overlapped, Intersected, and Interlocked Letters. |
There are nothing interesting in combined letters (Case [1]). They are just a sequence of two or more letters placed side-by-side without overlapping. Dragging letters over the Canvas - and probably slight rotating - are all skills needed for this purpose.
Also Case [2] is very trivial: let's consider the letters lie each on its own plane so all planes are parallel, thereby no intersection is possible. Again, dragging/rotating is only required to take letters in the stack - the latter (in sense of creation) is above and overlaps the first.
Other two cases are more complicated because of intersections. Letters are no longer parallel - they overlap each other with intertwining (open-shaped letters, Case [3]) or even interlocking (close-shaped letters, Case [4]). Both such cases are the subject of the further discussion in this tutorial.
| [1] | [2] | [3] | [4] | |
|---|---|---|---|---|
| Combining | + | + | + | + |
| Overlapping | - | + | + | + |
| Intersecting | - | - | + | + |
| Interlocking | - | - | - | + |
Note
In the rest of the tutorial I usually tend to use overlapping in meaning overlapping without intersection, such as in Case [2].
Task and Decision
 |
| Figure 2: Open- and close-shaped letters in pairs. |
The letters above (see Figure 2) should be intersected but they aren't. They are only overlapped. It seems completely impossible to insert letters each inside other keeping their integrity, doesn't it?
Well, just split one of letters into pieces using some extra simple shape and Division from the Path menu (see detailed step-by-step Instructions below). Repeat this process for each pair. Then create an additional layer and distribute the whole letters and pieces of another ones among all layers in the proper order. That's all.
Required Tools
- Selector
- Text Tool
- Rectangle Tool
Instructions
- Run Inkscape.
- Set desired document properties.
- Choose letters to interlock and create a separate text object for each letter using the Text Tool. Set desired font, size, color, and other properties (see Figure 3).
- Create a rectangle using the Rectangle Tool. Drag the rectangle over one of letters using the Selector and/or arrow keys to overlap the piece to be split. Adjust overlapping with ALT + arrow keys (see Figure 3).
- Select both the rectangle and the overlapped letter (SHIFT + Selector).
- Execute Path -> Division on the selected items. It split the letter into two pieces. The rectangle disappears (see Figure 3).
- Repeat Steps 4 to 6 to split more pieces if needed (see Figure 3).
- Place both whole and split letters in the desired manner - yet despite intersecting though (see Figure 3).
- Create a new layer above the current one (Layer -> Add Layer...).
- Select the piece or pieces of the split letter having to be above the whole letter. Use ALT + Selector repeatedly, if necessary, to be able to select the required piece(s).
- Execute Layer -> Move Selection to Layer Above (see Figure 3).
- Save your work.
- Enjoy.
 |
| Figure 3. Interlocked Monogram: Important Steps. |
Summary
In this tutorial we have learned the effective design of Interlocked Monogram. The way covered here is simple, easy, and fast. No advanced knowledge or skills are prerequisite. We have also tried to show the spatial relationship between the letters forming the monogram.
Specifically, we covered:
- Usage of Division to split letters into pieces;
- Distribution of the split pieces between layers;
- Intersections of letters (intertwining and interlocking).
These new skills may be applied to a much wider range of objects that explicitly enhance your artistic opportunities.
No comments:
Post a Comment